Workshop 4 - Shot List
The following exposures were taken in Aperture Priority mode using an ISO setting of 100 (except shot 1 - ISO 200) and with the light source as indicated:
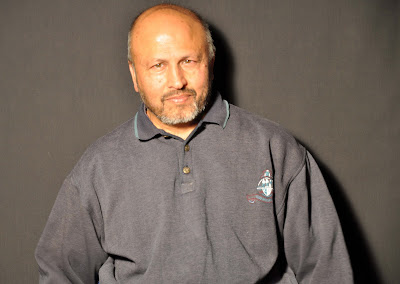
Shot 1 - Subject with front lighting against black background
Aperture: f/5.6
Shutter speed: 1/20
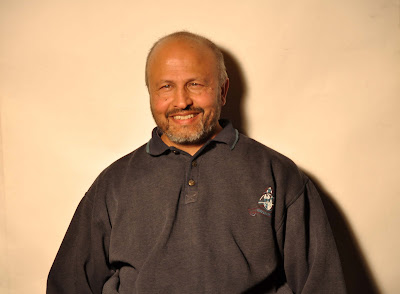
Shot 2 - Subject with front lighting against white background
Aperture: f/6.3
Shutter speed: 1/30
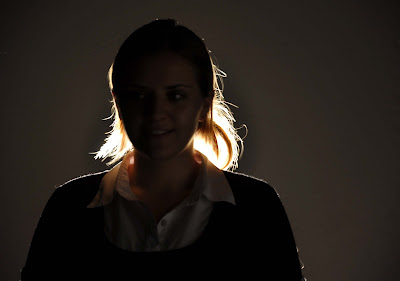
Shot 3 - Subject backlit with white background
Aperture: f/5.6
Shutter speed: 1/15
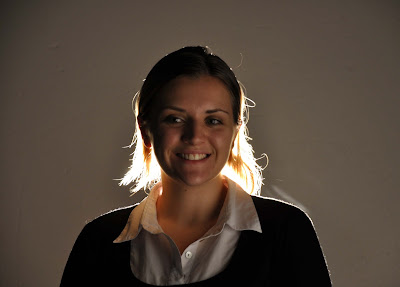
Shot 3a - Subject backlit with white background and use of reflector
Apeture: f/6.3
Shutter speed: 1/5
Shot 3b - Subject backlit with white background, use of reflector and using Exposure Compensation of +1.0
Apeture: f/6.3
Shutter speed: 1/6
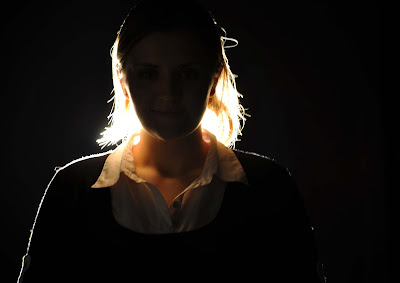
Shot 4 - Subject backlit with black background
Aperture: f/5.6
Shutter speed: 1/2
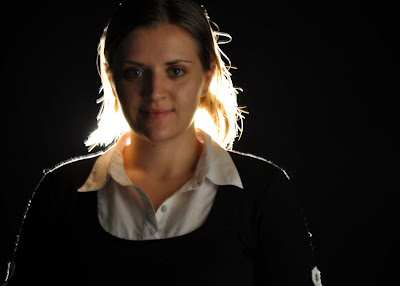
Shot 4a - Subject backlit with black background and use of reflector
Aperture: f/5.6
Shutter speed: 1/4
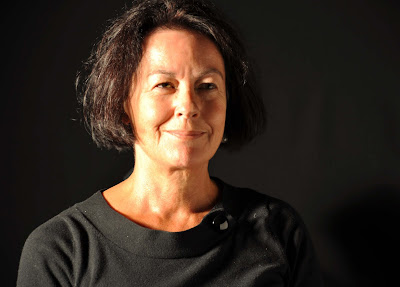
Shot 5 - Subject with side lighting
Aperture: f/5.6
Shutter speed: 1/15
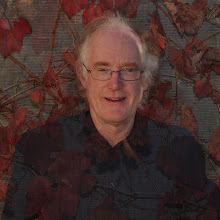
Shot 5a - Subject with side lighting and use of reflector
Aperture: f/5.6
Shutter speed: 1/25
Here are the resulting images:
Shot 1:
Shot 2:
Shot 3:
Shot 3(a):

Shot 3(b):
Shot 4:
Shot 4(a):
Shot 5:

Shot 5(a):
Comments:
Front lighting gives a good, even exposure to the subject, but tends to flatten the image due to a lack of contrast.
In shots 1 and 2, we can see the results of the camera calculating exposure according to 18% grey. In shot 1, against the black background, the camera over-compensates for the level of over exposure required. The result is to make the model's shirt appear too light. In shot 2, we see the opposite effect with the camera over-compensating for the level of under exposure required. This gives the appearance of the shirt being too dark.
Back lighting creates a silhouette appearance and also creates a 'halo' effect of light behind the subject. The main issue in taking this shot is to provide some light and contrast over the very dark face. This problem was overcome by using a reflector panel to one side of the subject to provide an indirect source of light.
In shots 3 and 4, see can see how backlighting darkens the face of the subject. The improvement made possible by the reflector is shown in shots 3(a) and 4(a). In addition, in shot 3(b), an Exposure Compensation of +1 was used to further improve exposure of the subject's face.
Side lighting, of course, has the effect of one side of the subject's face being well-lit while the side away from the light source appears very dark. This can be either good or bad, depending on the type of portrait the photographer is looking for. Because of the symmetry of the face, light and dark sides can enhance the character of the subject. In shot 5, we can see a very dramatic difference in this light and shadow effect. However, the end result is much more pleasing in shot 5(a) where a reflector has been used to even out the distribution of light while still giving an interesting range of light and shadow. In shot 5(a), helped by the reflector, see see a good level of contrast. This compares favourably to the front lighting used in shots 1 and 2 where the more even light over the face also flattens the contrast.
The following exposures were taken in Aperture Priority mode using an ISO setting of 100 (except shot 1 - ISO 200) and with the light source as indicated:
Shot 1 - Subject with front lighting against black background
Aperture: f/5.6
Shutter speed: 1/20
Shot 2 - Subject with front lighting against white background
Aperture: f/6.3
Shutter speed: 1/30
Shot 3 - Subject backlit with white background
Aperture: f/5.6
Shutter speed: 1/15
Shot 3a - Subject backlit with white background and use of reflector
Apeture: f/6.3
Shutter speed: 1/5
Shot 3b - Subject backlit with white background, use of reflector and using Exposure Compensation of +1.0
Apeture: f/6.3
Shutter speed: 1/6
Shot 4 - Subject backlit with black background
Aperture: f/5.6
Shutter speed: 1/2
Shot 4a - Subject backlit with black background and use of reflector
Aperture: f/5.6
Shutter speed: 1/4
Shot 5 - Subject with side lighting
Aperture: f/5.6
Shutter speed: 1/15
Shot 5a - Subject with side lighting and use of reflector
Aperture: f/5.6
Shutter speed: 1/25
Here are the resulting images:
Shot 1:

Shot 2:

Shot 3:

Shot 3(a):

Shot 3(b):

Shot 4:

Shot 4(a):

Shot 5:

Shot 5(a):

Comments:
Front lighting gives a good, even exposure to the subject, but tends to flatten the image due to a lack of contrast.
In shots 1 and 2, we can see the results of the camera calculating exposure according to 18% grey. In shot 1, against the black background, the camera over-compensates for the level of over exposure required. The result is to make the model's shirt appear too light. In shot 2, we see the opposite effect with the camera over-compensating for the level of under exposure required. This gives the appearance of the shirt being too dark.
Back lighting creates a silhouette appearance and also creates a 'halo' effect of light behind the subject. The main issue in taking this shot is to provide some light and contrast over the very dark face. This problem was overcome by using a reflector panel to one side of the subject to provide an indirect source of light.
In shots 3 and 4, see can see how backlighting darkens the face of the subject. The improvement made possible by the reflector is shown in shots 3(a) and 4(a). In addition, in shot 3(b), an Exposure Compensation of +1 was used to further improve exposure of the subject's face.
Side lighting, of course, has the effect of one side of the subject's face being well-lit while the side away from the light source appears very dark. This can be either good or bad, depending on the type of portrait the photographer is looking for. Because of the symmetry of the face, light and dark sides can enhance the character of the subject. In shot 5, we can see a very dramatic difference in this light and shadow effect. However, the end result is much more pleasing in shot 5(a) where a reflector has been used to even out the distribution of light while still giving an interesting range of light and shadow. In shot 5(a), helped by the reflector, see see a good level of contrast. This compares favourably to the front lighting used in shots 1 and 2 where the more even light over the face also flattens the contrast.


0 comments:
Post a Comment